Applications, processes and threads
Process
- 1 application (that can be made of several components) = 1 system process
- Component → processus mapping can be modified in the manifest (AndroidManifest.xml)
- The less important process can be killed by the system in case of memory shortage
Order of precedence for the importance of an application (process):
-
Foreground process
- One of its activities is visible on the top of the screen
- One of its BroadcastReceiver is currently running (onReceive method)
- One of its Service has a running event method (onCreate, onStart, onDestroy)
-
Visible process
- One of its activities is partially visible
- One of its Service is running as a foreground service
-
Service process
- One of its Service is running (but not as a foreground service)
-
Cached process
- A process that is kept in cache in memory
☞ An application that is used by an application with more priority inherits of its priority
Example: if an application A with a visible activity uses the ContentProvider of an application B, B will be considered also as a foreground process
Threads
Main thread
- A single thread is used to manage the events of the GUI (main looper)
-
This main thread must not be blocked with long computations or network communications
- Otherwise, beware of the infamous Application Not Responding error!
- The events of the lifecycle of the components of the app (Activity, Service, BroadcastReceiver...) are executed on the main thread using overriden onX() methods
- The methods of the lifecycle and the graphical components are not thread-safe: only the main thread must use them
Utility threads
- Utility threads are used to manage memory (heap) in the application (garbage collecting)
- The developer has not to worry about them
Secondary threads
- Secondary threads can be created using new Thread(new Runnable() { … }).start()
- In Java, it is more relevant to use AsyncTask rather than dealing onself with threads
Coroutines
- Coroutines are a feature introduced with the Kotlin language (not available in Java)
- They can be seen as suspendable functions (suspend keyword) that can be paused and resumed
- With coroutines it is possible to wait passively in the main thread without blocking the thread
Case of Thread.sleep and suspend fun delay:
- With Thread.sleep(1000) the thread is blocked during one second: no other task can be done in the thread during this second
- With delay(1000L) the thread is not blocked; the hand is given to another coroutine
Creation of a new project
With an IDE
With Android Studio (File > New Project wizard):
- One use a template (skeleton) for the first activity of the project (for a simple Hello World activity, one use Empty activity)
-
One supplies the following information:
- The name of the project
- The package of the project that will be the application identifier on the system and also on stores on which the application is published (this name must be unique; it is generally prefixed by the organisation domain in reverse order)
- The path of the project on the filesystem
- The language used: Java or Kotlin. This choice is not definitive; Java and Kotlin classes can coexist in the same application
- The minSdk level: it is the minimal version on which the application can be installed. A wise strategy is to use the lowest minSdk level to ensure the maximum compatibility and increase it later if needed (in the build.gradle file).
With the CLI
android create project
	--target <target_ID> \
	--name <your_project_name> \
	--path path/to/your/project \
	--activity <your_activity_name> \
	--package <your_package_namespace>
From the API level 19, the options -g -v 0.10 (0.10 to be replaced by the Gradle version) allow to create a project managed by Gradle rather than Ant.
One can update a project from a previous SDK:
android update project \
	--name <project_name> \
	--target <target_ID> \
	--path <path_to_your_project>
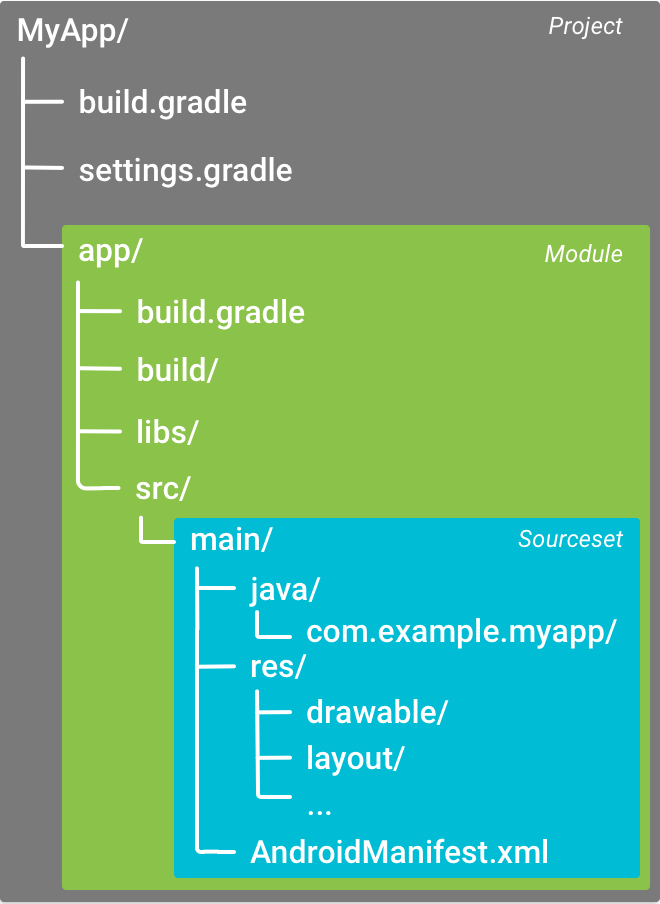
Typical structure of a project
- app/src/main/java: Java sources of the module /app
- app/lib/: jars for embedded libraries
- app/src/main/res/: resources, static data with possible different versions according to the execution context (i18n strings, layouts, menus, images, sounds...)
- app/src/main/assets/: directory (that can be listed during the execution) with binary resources
-
build/: generated Java code
- compiled classes
- R.java: class with identifiers for all the resourcesréférençant par constantes les ressources), classes compilées
- generated APK file
- app/src/AndroidManifest.xml: declaration of the metadata of the project (permissions, activities, description of the components...)
A first activity: the traditional Hello World !
Building programmatically the user interface
We can build the user interface with Java code.
// Code sample from Coursand [http://igm.univ-mlv.fr/~chilowi/], under the Apache 2.0 License

package fr.upem.coursand.helloworld;

import java.util.Date;

import android.app.Activity;
import android.content.Intent;
import android.os.Bundle;
import android.view.Gravity;
import android.view.ViewGroup.LayoutParams;
import android.widget.Button;
import android.widget.LinearLayout;
import android.widget.TextView;

/**
 * An Hello World example programmed in Java.
 * The simple Hello World layout is installed programmatically.
 */
public class HelloWorldJava extends Activity
{
	@Override
	protected void onCreate(Bundle savedInstanceState)
	{
		// We must never forget to call the super method in every onX() method overridden in the activity
		super.onCreate(savedInstanceState);
		// We create ourselves the layout rather than loading it from a XML description
		LinearLayout layout = new LinearLayout(this); // New layout: container for the graphical elements
		layout.setOrientation(LinearLayout.VERTICAL);
		TextView tv = new TextView(this);
		tv.setText("Hello World at " + new Date()); // The string should be externalized as a resource
		tv.setGravity(Gravity.CENTER);
		LinearLayout.LayoutParams tvParams =
			new LinearLayout.LayoutParams(LayoutParams.MATCH_PARENT /*width*/, LayoutParams.WRAP_CONTENT /*height*/, 1/*weight*/);
		layout.addView(tv, tvParams);
		Button b = new Button(this);
		b.setText("Quit the activity");
		// We choose a weight of 1 for the TextView and 0 for the button (only the TextView will be resized)
		LinearLayout.LayoutParams buttonParams =
			new LinearLayout.LayoutParams(LayoutParams.MATCH_PARENT, LayoutParams.WRAP_CONTENT, 0);
		layout.addView(b, buttonParams);
		Button b2 = new Button(this);
		b2.setText("Restart activity");
		layout.addView(b2, buttonParams);
		// We add a listener for the click event of the button to finish the activity
		b.setOnClickListener(view -> finish());
		// We add a listener on a button for the activity to start a new instance of itself
		b2.setOnClickListener(view -> startActivity(new Intent(this, HelloWorldJava.class)));
		setContentView(layout);
	}
}
Building the user interface with a XML layout
Using a XML file to describe the layout is prefered:
<?xml version="1.0" encoding="utf-8"?>
<!-- Code sample from Coursand [http://igm.univ-mlv.fr/~chilowi/], under the Apache 2.0 License -->

<LinearLayout xmlns:android="http://schemas.android.com/apk/res/android"
    xmlns:app="http://schemas.android.com/apk/res-auto"
    xmlns:tools="http://schemas.android.com/tools"
    android:layout_width="match_parent"
    android:layout_height="match_parent"
    android:orientation="vertical"
    tools:context="fr.upem.coursand.helloworld.HelloWorldXml">

    <TextView
        android:id="@+id/textView"
        android:layout_width="match_parent"
        android:layout_height="wrap_content"
        android:layout_weight="1"
        android:text="TextView" />


    <Button
        android:id="@+id/button"
        android:layout_width="match_parent"
        android:layout_height="wrap_content"
        android:onClick="quitActivity"
        android:text="@string/quit_the_activity" />

    <Button
        android:layout_width="match_parent"
        android:layout_height="wrap_content"
        android:onClick="startNewActivityInstance"
        android:text="@string/restart_the_activity" />


</LinearLayout>
AndroidManifest.xml : example
<?xml version="1.0" encoding="utf-8"?>
<manifest xmlns:android="http://schemas.android.com/apk/res/android"
    package="fr.upemlv.helloworld"
    android:versionCode="1"
    android:versionName="1.0" >

    <uses-sdk
        android:minSdkVersion="8"
        android:targetSdkVersion="16" />

    <application
        android:allowBackup="true"
        android:icon="@drawable/ic_launcher"
        android:label="@string/app_name"
        android:theme="@style/AppBaseTheme" >
        <activity
            android:name="fr.upemlv.helloworld.HelloWorld"
            android:label="@string/app_name" >
            <intent-filter>
                <action android:name="android.intent.action.MAIN" />

                <category android:name="android.intent.category.LAUNCHER" />
            </intent-filter>
        </activity>
    </application>

</manifest>
Some notes:
- The final manifest is the result of the merge of the manifest written in src and the information inside the android section of the build.gradle file
- The name of the package must be unique to be published on a store
-
Compatibility of the project with several versions of Android:
- minSdkVersion: minimal version of Android required to install the app (to exclude old versions that cannot use some essential features of the app)
-
targetSdkVersion:
- version used to test the app
- if the app is installed on a more recent system, ascendant compatibility mecanisms can be used
- stores can enforce the use of a mininal targetSdkVersion
- About the retrocompatibility
-
The first activity Hello World is declared in the manifest, it can be started from the launcher with the specified intent filter
- Typically only the main activity of an application should be accessible from the launcher, other activities are started from the main activity (directly or indirectly)
Resource management
- Resources in res/
-
Resources for different contexts:
-
Several languages: i18n (internationalization)
- res/values-LG/strings.xml contains the strings for one language (res/values/strings.xml for the strings for the default languages)
-
Several sizes, resolutions and geometries for screens
- the directories res/drawable-X/, res/mipmap-X... contain the images of each kind of screen (X={l,m,h,xh}dpi)
-
Several languages: i18n (internationalization)
-
Description of the GUI:
- res/layout: layout description in XML (graphically editable with Android Studio)
- res/menu: description of the menus in XML
- Resources listed in R.java (auto-generation) as integer constants
- Global resources are provided by the class android.R (icons, layouts...) ; beware to not use the global R class instead of the local R class of the application (look at the imported class)
Internationalization of HelloWorld
Android Studio proposes an embedded editor to internationalize the strings. One can also edit the XML files by hand.
File res/values/strings.xml
<?xml version="1.0" encoding="utf-8"?>
<resources>
<string name="hello_world">Hello World UMLV!</string>
</resources>
File res/values-fr/strings.xml
<?xml version="1.0" encoding="utf-8"?>
<resources>
<string name="hello_world">Bonjour le monde UMLV !</string>
</resources>
Using the string reference
tv.setText(R.string.hello_world);
String with placeholders
One can put printf-like pladeholders in the strings that can be replaced:
- %s for a string
- %d for an integer
- %f for a float...
<string name="hello_world">Hello World to %s, you are %d year old!</string>
tv.setText(getString(R.string.hello_world, "foobar", 42));
Compilation of the project
Compilation chain
- Compilation with a Gradle script
-
If you are courageous, you can compile by hand
-
Generation of code
- IPC management with Android Interface Definition Language
- Creation of the R.java file with aapt
- Generation of code with RenderScript (since HoneyComb) for computation and graphical rendering
- Generation of BuildConfig (debug info for compilation)
-
Old compilation chain
- Traditional javac
- ProGuard to optimize and obfuscate bytecode
- Conversion of Java bytecode to Dalvik bytecode with dex
-
New compilation chain
- New compilter jack that generates dex bytecode from Java sources
- Package and compression of resources with aapt
- Final package of bytecode and resources with apkbuilder
- Signature of the apk with jarsigner
- Non-compressed resource alignment with zipalign (to make memory access with mmap easier)
-
Generation of code
- When the APK is installed, since Android 5.0, dex2oat compiles the DEX bytecode to native ELF code
Some explanations to compile a project from command-line can be found in this tutorial
Using Gradle
- Gradle: project building software using the Groovy language (script language that can be executed on the JVM)
-
One can use Gradle:
- From Android Studio
-
From the command-line (useful for building, continuous integration, testing...) :
- gradlew tasks to get all the building tasks
- gradlew assembleDebug to create a debug APK (assembleRelease for a release APK)
- gradlew installDebug to install the debug APK on the default device
Gradle configuration files
-
build.gradle file at the root of the project
- Definition of the repositories and dependencies for all the modules
-
build.gradle for the module (typically each project has a single app module)
-
Dependencies of the module in the section dependencies
- With implementation for the non transitive dependencies
- With api for the transitive dependencies
-
android section to build the manifest
- compileSdkVersion x: version of the SDK used for the compilation
- buildToolsVersion "x": version of the tools used
-
Section defaultConfig
- applicationId 'x': identifier of the application (typically the name of the package) ; must be unique for a publication on a store
- minSdkVersion x: any install on an Android device having an API level smaller than this version will fail
- targetSdkVersion x : API level used to test the application (don't prevent the install on smaller API levels)
- versionCode x: internal version number of the application (must be an integer that is incremented for each version)
- versionName "x": internal name of the version
-
Dependencies of the module in the section dependencies
-
gradle.properties https://docs.gradle.org/current/userguide/build_environment.html at the root of the project (entry-key couples)
- Verbosity, number of threads used for the compilation, heap memory, use of the cache...
- gradle.properties can be put also in ~/.gradle for global properties (local gradle.properties can redefine values)
-
local.properties àt the root of the project
- Definition of the directories: SDK (sdk.dir=...), NDK (ndk.dir=...)...
- This file must not be versioned in a repository (custom configuration for each machine) ; it is listed by default in .gitignore
Build variants
- Build variants allow to create several versions of the same application
-
buildTypes allow to build debug and release versions:
- Version debug: version signed by a transient debug key with no code optimization and debug symbols kept
-
Version release: signature by a perennial key
- ⚠ Do not lose or leak the key (otherwise an attacker could publish malicious updates of the app)
- optimized code, removal of debugging symbols, elimination of the dead code with ProGuard....
-
productFlavors allow to create several flavors of our application
- Definition of dimensions: for each dimension we can use different flavors
-
Examples of dimensions with associated flavors (to be defined by the developer):
- Dimension cost: flavor free (free version with ads), flavor paid, flavor premium (ameliorated paid version)
- Dimension google: flavor withoutGoogleApi (version without Google APIs), withGoogleApi (version with Google APIs)
- Dimension res: flavor withHeavyResources (version with heavy resources offline), withoutHeavyResources (version without heavy resources)
- Dimension arch: if the app embeds native code (arm, x86, mips...)
- ...
-
Redefinition, new configuration parameters for each flavor (different build.gradle files)
- Redefinition of the applicationId (to ensure the uniqueness on the store for each flavor), of the minSdkVersion...
- New dependencies
- ...
-
A variant is the cartesian product of all the dimensions and the buildTypes
- Example: releaseFreeWithoutGoogleApiWithoutHeavyResourceArm
Sets of sources
- By default the sources are in src/main
-
One create additional sets of sources for a flavor or a specific build type:
- src/debug, src/release...
- src/free, src/paid...
- src/releaseFree, src/debugPaid...
- Several versions of the same file can coexist in different sets
- Source file lookup: from the most specific set to the less specific one (src/main)
Example of a build.gradle file for a module
apply plugin: 'com.android.application'

android {
	compileSdkVersion 28
	buildToolsVersion "29.0.0"

	defaultConfig {
		applicationId 'com.example.myapp'
		minSdkVersion 15
		targetSdkVersion 28
		versionCode 1
		versionName "1.0"
	}

	buildTypes {
		release {
			minifyEnabled true // Enables code shrinking for the release build type.
			proguardFiles getDefaultProguardFile('proguard-android.txt'), 'proguard-rules.pro'
		}
	}


  flavorDimensions "cost", "google"
  productFlavors {
    free {
      dimension "cost"
      applicationId 'com.example.myapp.free'
    }

    paid {
      dimension "cost"
      applicationId 'com.example.myapp.paid'
    }

    premium {
      dimension "premium"
      applicationId 'com.example.myapp.premium'
      // we can add a new source set in /app/src/premium for the additional features
    }

    withGoogleApi {
      dimension "google"

      dependencies {
		implementation 'com.google.android.gms:play-services-gcm:17.0.0'
		implementation 'com.google.android.gms:play-services-location:17.0.0'
	  }
	}

	withoutGoogleApi {
	  dimension "google"
	}
  }
}

dependencies {
    implementation project(":lib")
    implementation 'com.android.support:appcompat-v7:28.0.0'
    implementation fileTree(dir: 'libs', include: ['*.jar'])
}
Paquetages d'applications Android
Fichier APK
-
Applications Android empaquetées dans un fichier .apk (Android Package Kit) contenant :
- Le bytecode dex de l'application
- Le bytecode dex de toutes les bibliothèques Java utilisées (comprenant d'éventuelles bibliothèques de rétro-compatibilité)
- Des bibliothèques compilées nativement pour l'architecture
- Les ressources de l'application : layouts, chaînes de caractères, ressources binaires diverses embarquées... (répertoires res et assets)
- Le manifeste de l'application
-
Signature obligatoire du fichier .apk avec une clé privée :
- Clé privée temporaire pour le mode debug
-
Clé privée définitive pour la version release en vue d'une publication sur un store
- Utilisation de la même clé privée pour toutes les versions : l'utilisateur peut vérifier avec la clé publique que les paquetages proviennent de la même source
- ⚠ Ne pas publier le mot de passe de la clé dans le build.gradle ni ne versionner la clé dans le dépôt
Fichier AAR
- Empaquetage de toutes les données de l'application dans un fichier .aab (Android App Bundle)
-
Génération modulaire de plusieurs fichiers .apk pour l'application :
- Un fichier .apk avec les fonctionnalités de base
- Des fichiers .apk en fonction de la configuration de la machine (architecture, géométrie d'écran, langue...)
- Des fichiers .apk pour des fonctionnalités dynamiques (téléchargés uniquement lorsque l'utilisateur souhaite les utiliser)
-
Envoi vers le store du fichier .aab contenant toutes les données
- Génération et distribution par le store des .apk nécessaires pour chaque utilisateur
- Signature des .apk par le store et non plus par le développeur (⚠ le développeur doit communiquer sa clé privée au store)
Tester un projet
- Avant de compiler, analyse statique avec lint <projectdir>
- Compiler le projet : gradlew assembleDebug
-
Lancer un appareil de test sous Android :
- emulator @myAVD
- Ou connecter une vraie machine en USB (vérifier la connexion avec adb devices)
-
Installer l'application (préalablement empaquetée dans un apk) :
- adb install HelloWorld.apk
-
Lancer l'activité principale :
- adb shell am start -n fr.upemlv.helloworld/.HelloWorld
-
Analyse de l'exécution
- Surveiller les logs avec logcat (avec tag ActivityThread et de niveau INFO minimum) : adb logcat ActivityThread:I
- Utiliser la GUI Dalvik Debug Monitor (DDMS) avec monitor
Logcat
- Utilisation d'un buffer circulaire de taille fixée pour conserver les logs de toutes les applications
- Différents buffers de log : main, system, radio, events, crash
-
Méthodes statiques de log selon sévérité :
- Verbose : Log.v("tag", "message très verbeux")
- Debug : Log.d("tag", "message de débuggage")
- Info : Log.i("tag", "pour information")
- Warn : Log.w("tag", "quelque chose d'anormal s'est produit")
- Error : Log.e("tag", "une erreur critique a eu lieu")
- Fatal : sévérité réservée pour le système
- Généralement on utilise le nom de la classe (getClass().getName()) comme tag
- Ne plus utiliser System.out et System.err sous Android, préférer les méthodes de log
-
Filtrage du journal :
- Selon le niveau de sévérité
- Selon un tag (tag:), l'application (app:) ou le contenu (text:)
DDMS
- Outil de déverminage se connectant à des VMs
- Visualisation de l'état du tas (objets, allocations mémoire)
- Visualisation des threads utilisées avec pile d'appel
- Accès au système de fichiers
- Profilage de méthodes (pour déterminer le code à optimiser en priorité)
- Emulation de fonctionnalité de communication (appel cellulaire, SMS, faux localisateur...)
Tâches
- Tâche = regroupement logique d'activités en pile ; permet la navigation temporelle
- Création d'une nouvelle tâche : typiquement depuis le launcher
- Coexistence possible de plusieurs tâches, mais une unique tâche affichée
-
Manipulation de la pile d'une tâche :
- Activité A lance activité B : B est empilé sur A
- Touche retour : B est détruite et dépilée
- Touche home : la tâche est mise en arrière-plan ; l'activité de bas de pile est préservée, les autres peuvent être détruites après un laps de temps variable
Comportements spécifiques pour les instances d'activité
-
launchMode :
- standard : une activité peut être instantiée plusieurs fois (et donc être multi-présente dans la pile)
- singleTop : plusieurs instances de la même activité ne peuvent être présentes consécutivement dans la pile
- singleTask : l'activité ne peut être présente que dans une seule tâche à sa racine : peut aussi être forcé par le drapeau d'Intent FLAG_ACTIVITY_NEW_TASK
- singleInstance : l'activité est l'unique élément dans sa tâche (nouvelle activité lancée ⟶ nouvelle tâche)
- alwaysRetainTaskState : si vrai pour l'activité racine ne détruit pas les activités de sommet de pile d'une tâche restée en arrière-plan
- clearTaskOnLaunch : si vrai pour l'activité racine détruit systématiquement les activités de sommet de pile lors du passage en arrière-plan
- finishTaskOnLaunch : si vrai, détruit l'activité en cas de passage en arrière-plan
Ajout d'un intent-filter pour permettre le lancement depuis le launcher :
<activity ... >
    <intent-filter ... >
        <action android:name="android.intent.action.MAIN" />
        <category android:name="android.intent.category.LAUNCHER" />
    </intent-filter>
    ...
</activity>
Cycle de vie d'une activité
- Une seule activité ayant à l'écran le focus (sommet de pile de la tâche courante)
-
Depuis Android 7, le mode multi-fenêtré est supporté :
- Depuis l'écran d'aperçu (tâches récentes), l'écran peut être partagé en deux parties avec deux activités affichées côte-à-côte
- Une activité peut être en surimpression comme pastille sur une autre activité (mode picture in picture)
-
Activités invisibles (autres tâches, fond de pile) :
- RAM : présentes (ou pas si pénurie de mémoire)
- CPU : ne doivent pas exécuter des threads de calcul (tâche dévolue aux services)
-
Passage de l'état visible à invisible :
- En lançant une nouvelle activité masquant l'activité courante
- En mettant la tâche en arrière avec le bouton home
-
En détruisant l'activité courante (finish(), bouton back)
- Depuis Android 12, le bouton back ne détruit plus les activité racines de bas de pile (comportement similaire à home)
- Comportement du bouton back modifiable en redéfinissant onBackPressed()
- Envoi d'événements à chaque changement de statut : gestion par listener onX() dans Activity
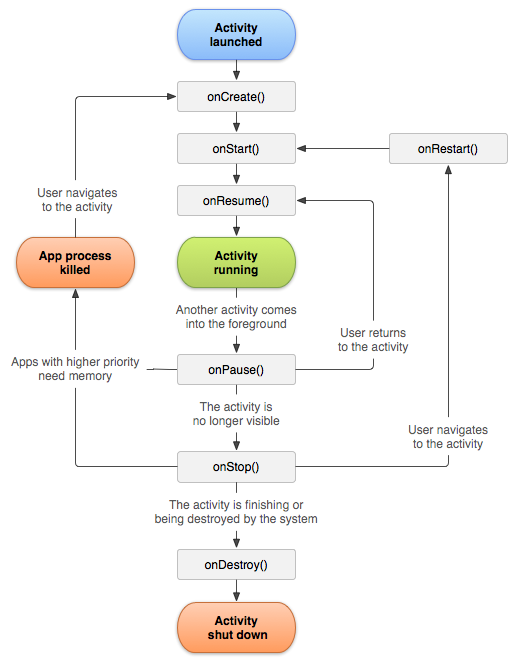
Listeners de changement d'état
-
Les méthodes appelées lors des changements d'état :
- onCreate(Bundle savedInstanceState) : initialisation des structures, (re)chargement des données dans le Bundle
- onStart() : affichage de l'activité à l'écran ; s'il s'agit d'un redémarrage, onRestart() est appelé avant
- onResume() : passage au 1er plan
- onPause() : remplacement de l'activité courante par une autre (sauvegarde de champs en cours d'édition, arrêt de threads d'animation)
- onStop() : activité rendue invisible, peut être ensuite tuée si pénurie de mémoire
- onDestroy() : destruction imminente de l'activité, libération de ressources
- Redéfinir toutes les méthodes n'est pas obligatoire ; si redéfinition ne pas oublier d'appeler d'abord super.onX()
-
Ne jamais initialiser des champs directement avec leur déclaration ou dans le constructeur (sauf pour les initialisations triviales)
- Ne jamais créer de constructeur personnalisé pour Activity (garder le constructeur par défaut sans argument)
- Toujours initialiser les champs dans onCreate()
Etat des activités en premier-plan en mode multi-fenêtré :
- Pour Android < 10, une seule activité (ayant le focus) est dans un état RESUMED (les autres sont PAUSED si affiché à l'écran ou STOPPED si invisible)
-
🆕 Pour Android ≥ 10, toutes les activités visibles sont en état RESUMED
- Introduction d'une nouvelle méthode de changement d'état onTopResumedActivityChanged (boolean isTop) équivalente à onResume()et onPause() des versions précédentes
Exemple : activité qui loggue tous les événements du cycle de vie avec logcat et les affiche dans un TextView
// Code sample from Coursand [http://igm.univ-mlv.fr/~chilowi/], under the Apache 2.0 License

package fr.upem.coursand.lifecycle;

import android.os.SystemClock;
import androidx.appcompat.app.AppCompatActivity;
import android.os.Bundle;
import android.util.Log;
import android.widget.TextView;

import fr.upem.coursand.R;

public class LifeCycleActivity extends AppCompatActivity {

    private TextView logView;
    private long startTimestamp;

    protected void log(String message) {
        Log.i("lifeCycleEvent", message);
        logView.append((SystemClock.elapsedRealtime() - startTimestamp) + " ms, " + message + "\n");
    }

    @Override
    protected void onCreate(Bundle savedInstanceState) {
        startTimestamp = SystemClock.elapsedRealtime(); // in millis
        super.onCreate(savedInstanceState);
        setContentView(R.layout.activity_life_cycle);
        logView = findViewById(R.id.logView);
        log("onCreate");
    }

    @Override
    protected void onStart() {
        super.onStart();
        log("onStart");
    }

    @Override
    protected void onStop() {
        super.onStop();
        log("onStop");
    }

    @Override
    protected void onPause() {
        super.onPause();
        log("onPause");
    }

    @Override
    protected void onResume() {
        super.onResume();
        log("onResume");
    }

    @Override
    protected void onRestart() {
        super.onRestart();
        log("onRestart");
    }

    @Override
    protected void onDestroy() {
        super.onDestroy();
        log("onDestroy"); // will not see in the TextView
    }
}